自动读真实评论 → 提炼选题 → 接入生成器网站 → 更新部署Auto-read real comments → distill topics → plug into the generator site → update & deploy
BobbyBobby
2026 年 7 月July 2026
今天的四步Four Steps Today
1
准备 & 连接Setup & Connect
连好 Codex 读网页的两种方式:Chrome 插件 / Computer Use。Connect Codex's two ways to read pages: Chrome extension / Computer Use.
2
读评论 · 出选题Read & Distill
读真实评论,提炼成选题卡。Read real comments and distill them into topic cards.
3
接进网站Wire Into Site
让 Codex 把选题接进你现有的生成器。Let Codex feed the topics into your generator.
4
上线 · 更新Deploy & Update
一键部署上线,定期更新选题。Deploy in one step, and update topics regularly.
开始前,先把这几样准备好Before Starting, Get These Ready
准备项Item
怎么做How
登录小红书Log in to Xiaohongshu
用 Chrome 登录,打开一个留学生热帖,把评论往下多滚动、点开几条“展开”。Log in via Chrome, open a hot student post, scroll and expand several comments.
打开 CodexOpen Codex
确认能正常对话、能读写你电脑上的文件。Confirm it can chat and read/write files on your computer.
网站项目在本地Site project on disk
把你的生成器网站文件夹(含 index.html)放在电脑上,先确认 Codex 能打开这个文件夹。Keep your generator folder (with index.html) on disk; first confirm Codex can open this folder.
提示Tip
先记住这个“改动前的样子”——一会儿改完好对比。Remember this "before" state so you can compare after editing.
两种让 Codex 读网页的方式Two Ways to Let Codex Read Pages
① Chrome 插件(@Chrome)① Chrome Extension (@Chrome)
用你现有的浏览器状态——已登录的网站、已打开的标签、页面内容。适合手动打开一个帖子、展开评论、只读当前这条;评论特别多时可能读取超时。Uses your existing browser state—logged-in sites, open tabs, page content. Best for opening one post, expanding comments, reading just that page; may time out when a post has very many comments.
② Computer Use(@Computer Use)② Computer Use (@Computer Use)
操作 Mac 上任意 App(浏览器只是其一),靠读屏 + 模拟点击/输入完成。适合自动逐个打开多个帖子、看完再统一总结,更稳;但要开系统录屏权限、每步需批准,较重。Controls any Mac app (the browser is just one) by reading the screen and clicking/typing. Best for auto-opening several posts and summarizing together; more stable, but needs screen-recording permission and per-step approval—heavier.
在哪装Where to install
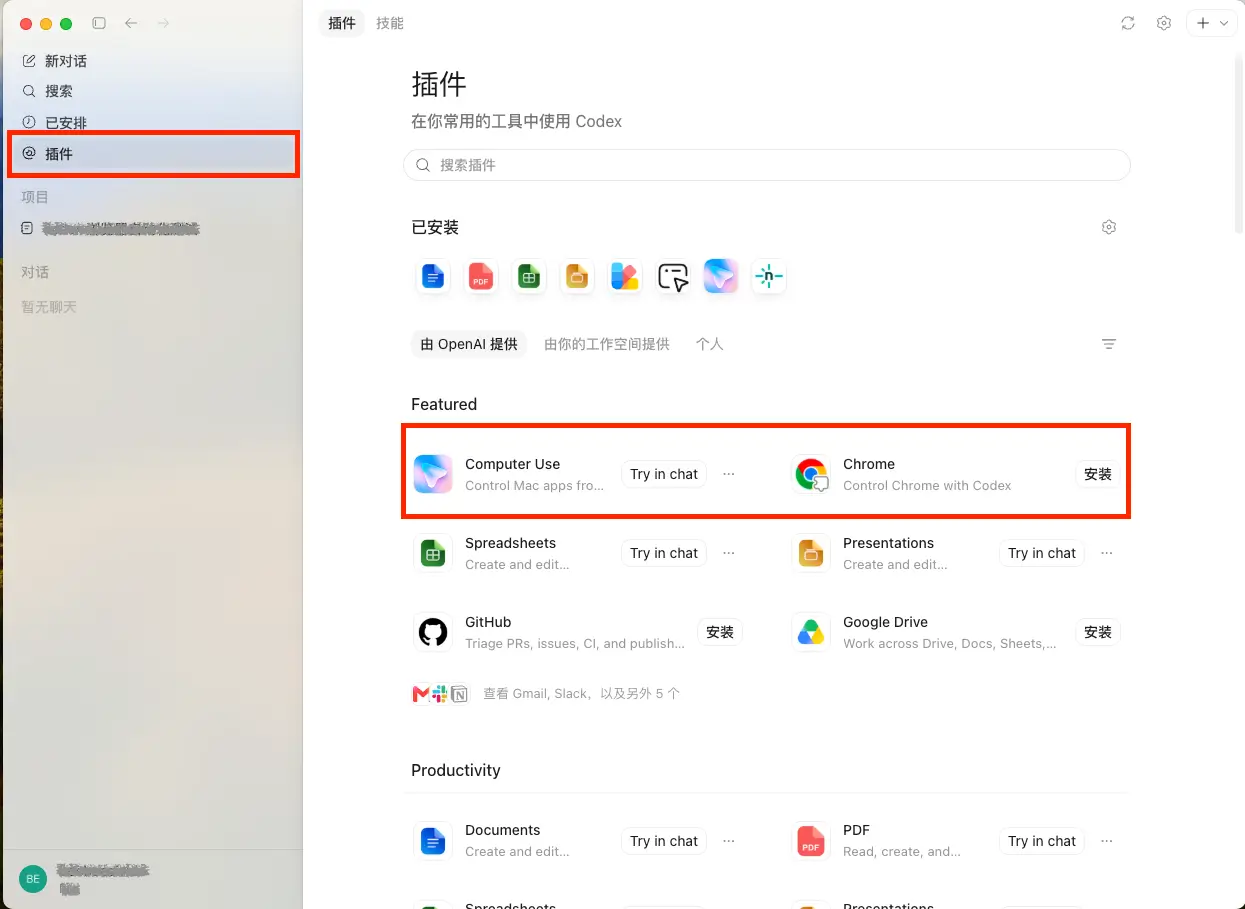
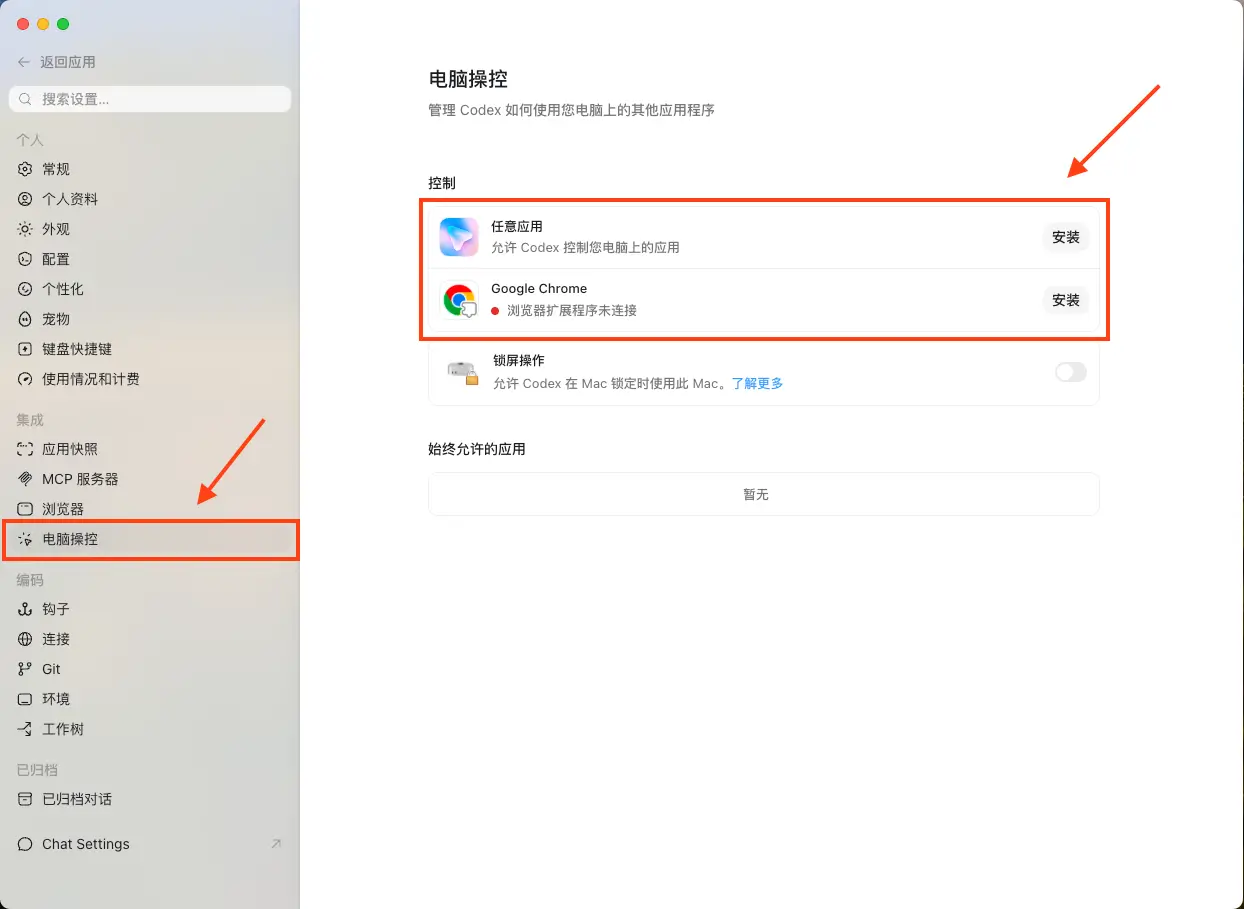
Computer Use 和 Chrome 这两个插件,在「Codex 设置 → 电脑操控」和「插件」页面里都有安装入口,任选其一即可。Both Computer Use and Chrome can be installed from either "Codex Settings → Computer control" or the "Plugins" page.
「插件」页面 Featured 里安装Install from the "Plugins" page (Featured)「设置 → 电脑操控」里安装Install from "Settings → Computer control"
选哪个Which one
读网页优先用 Chrome 插件(更轻、专为浏览器打造);Computer Use 是更通用但更重的选择,适合 Chrome 读不稳时切换使用。For reading web pages, prefer the Chrome extension (lighter, purpose-built for the browser); Computer Use is the more general but heavier option—switch to it when Chrome is unreliable.
⚠️ 风险提示⚠️ Risk note
可能触发平台风控——控制频率、优先小批量、放慢节奏。May trigger anti-bot controls—keep the frequency low, small batches, slow down.
Chrome 去/操作新网站前会先征求你同意,且可随时停止。Chrome asks before interacting with new sites, and you can stop anytime.
读到的内容可能含登录网站的敏感信息、且可能被用于训练(可在 OpenAI 账号数据设置里控制)。Content read may include sensitive info from logged-in sites and may be used for training (controllable in your OpenAI account data settings).
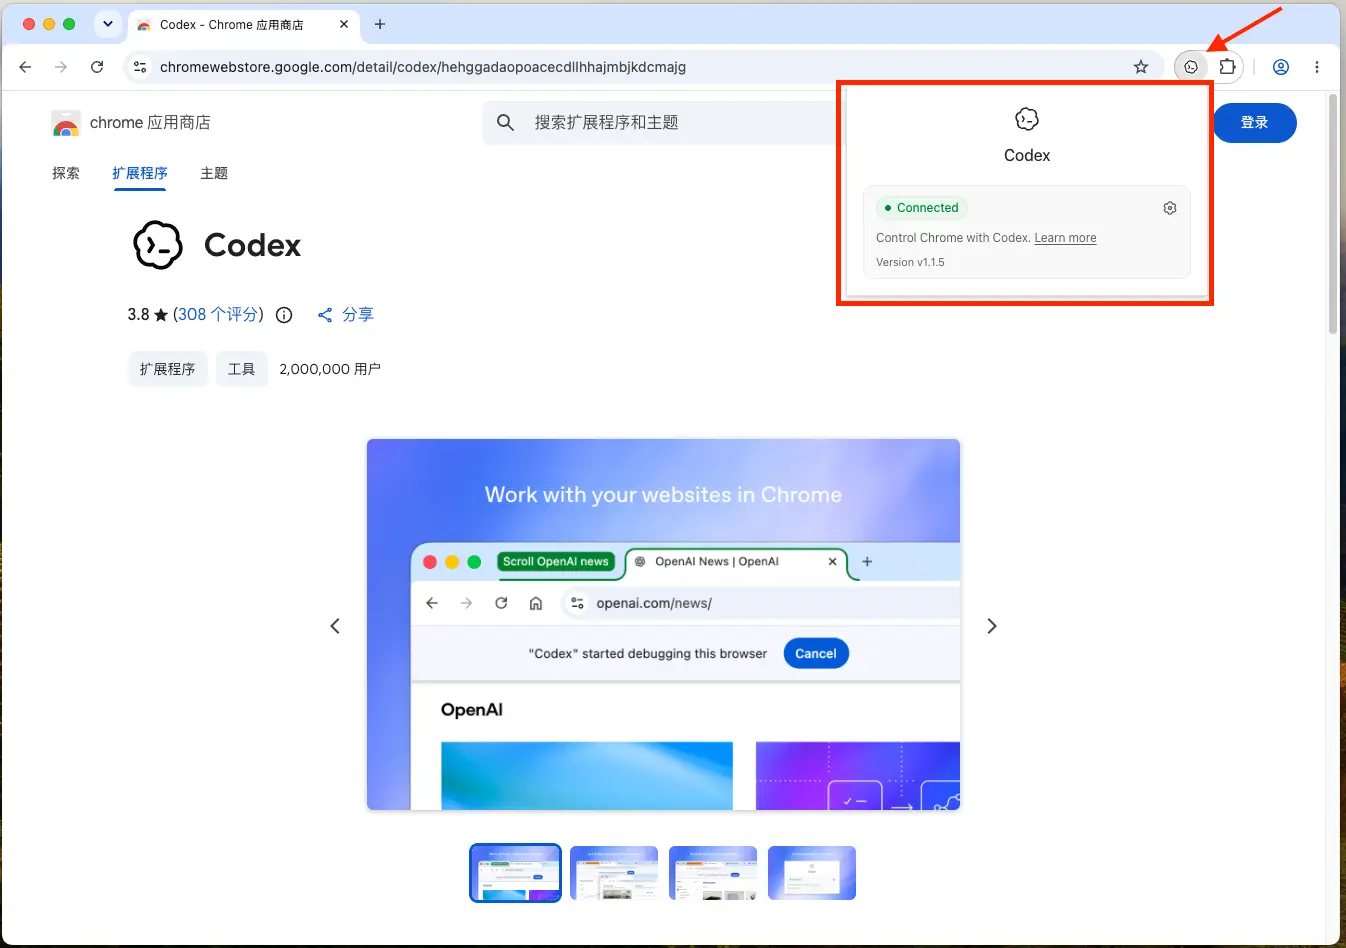
点浏览器右上角扩展图标,显示 Connected = 连好。Click the extension icon at the top-right; Connected = ready.
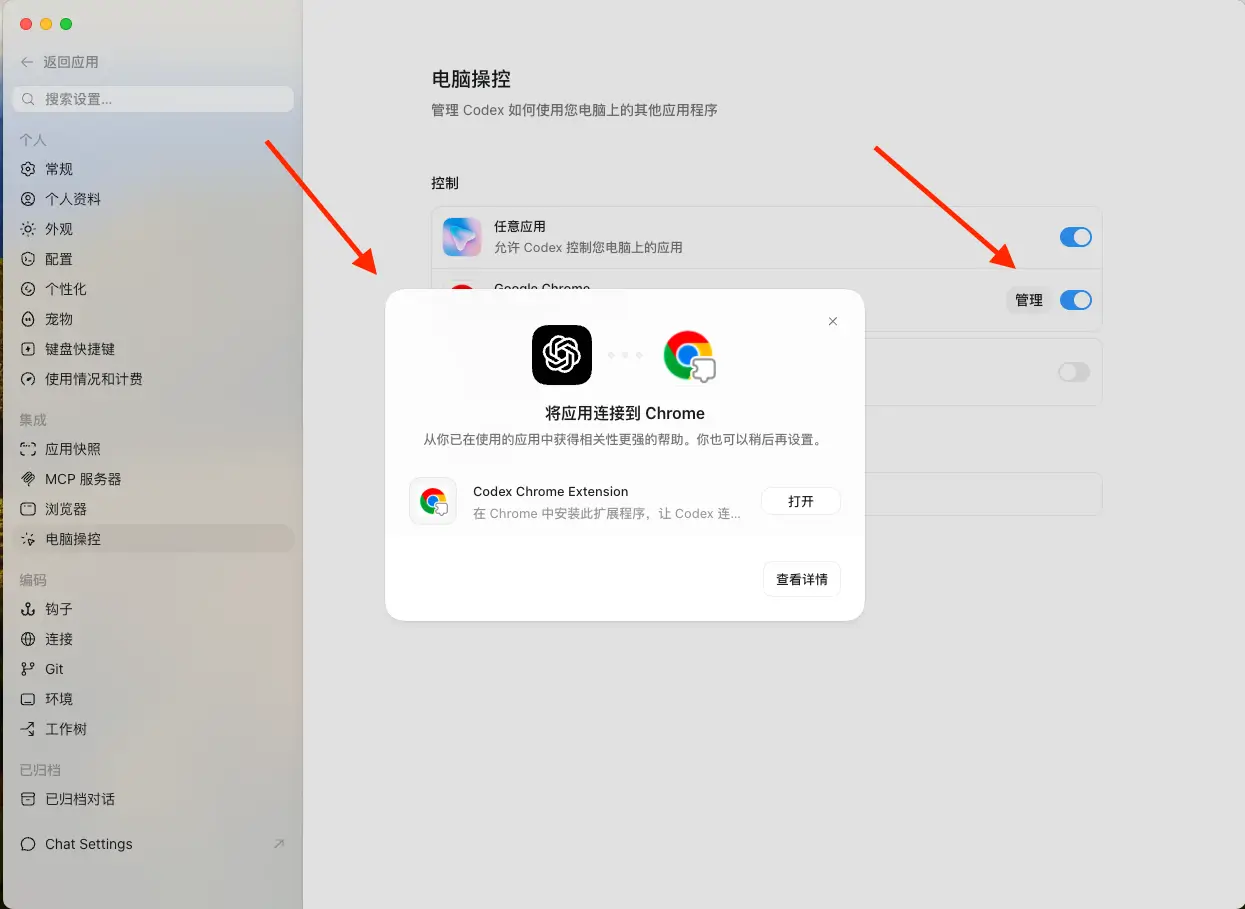
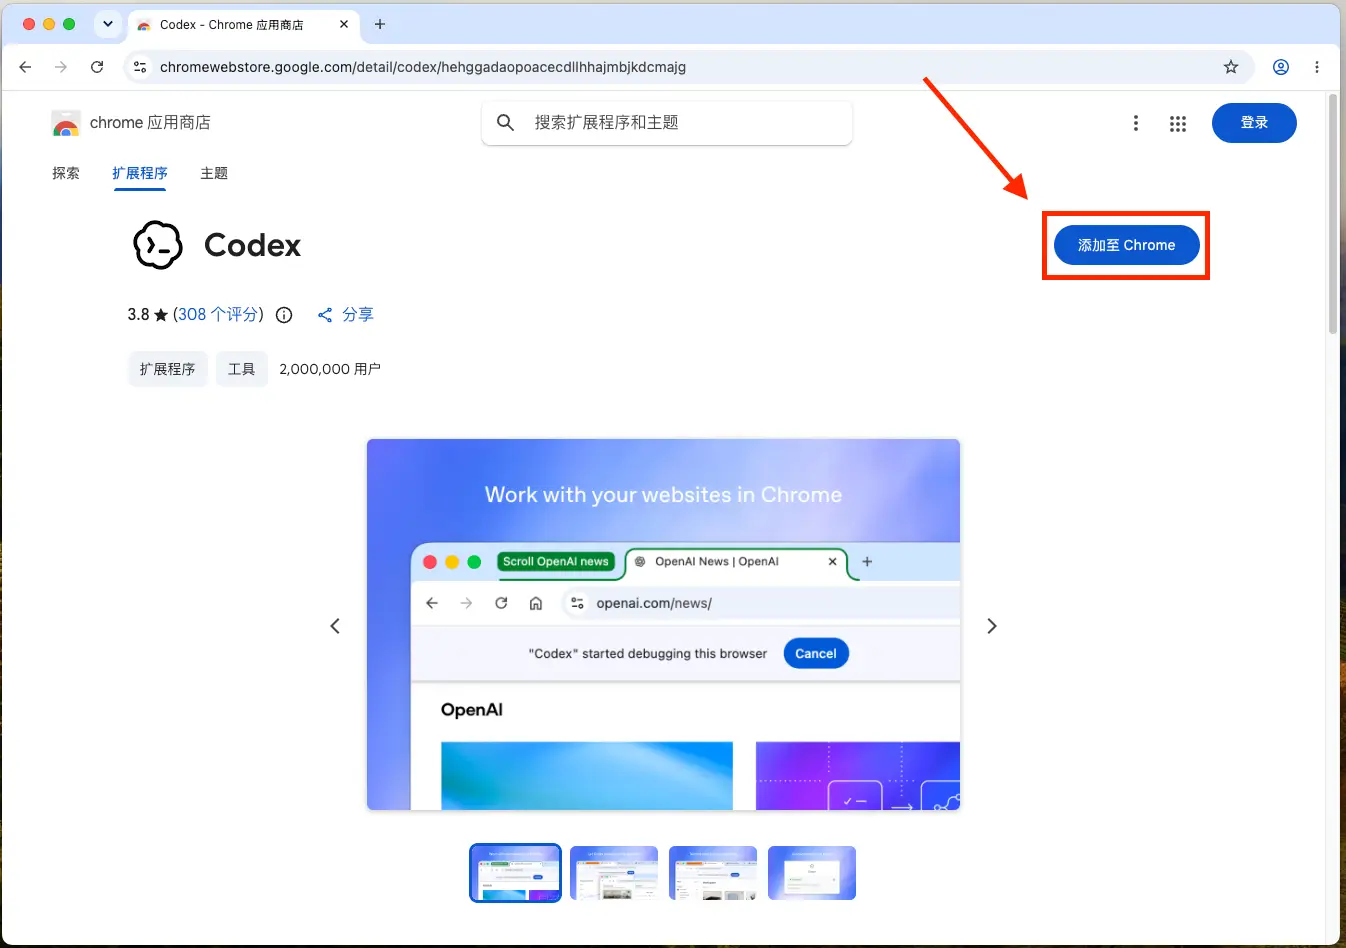
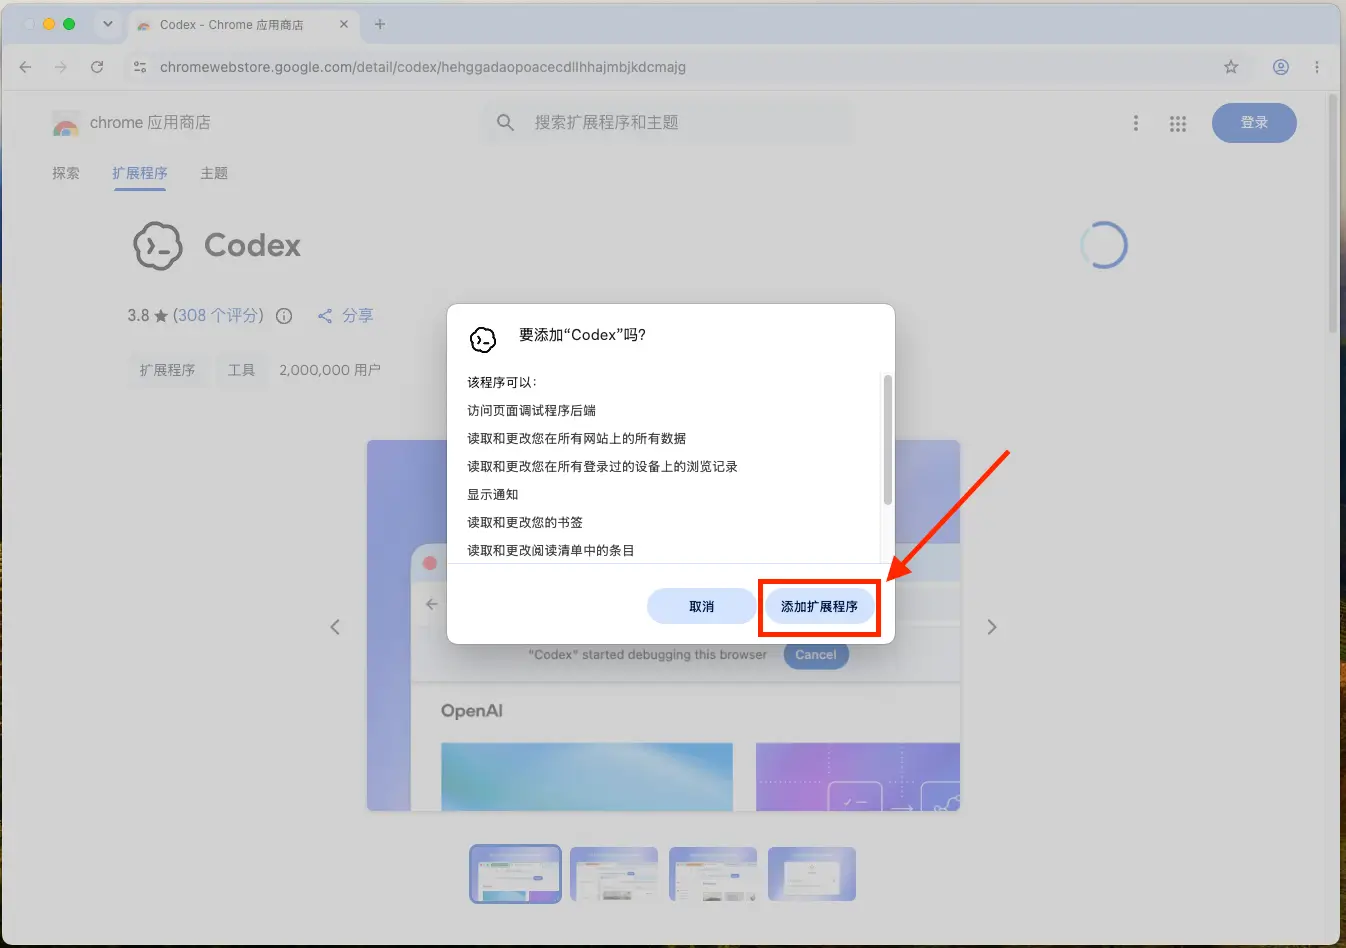
① 电脑操控 → Chrome → 安装 → 连接① Computer control → Chrome → Install → Connect② 添加至 Chrome② Add to Chrome③ 添加扩展程序③ Add extension④ 扩展显示 Connected④ Extension shows Connected
Chrome 插件:确认与使用Chrome Extension: Verify & Use
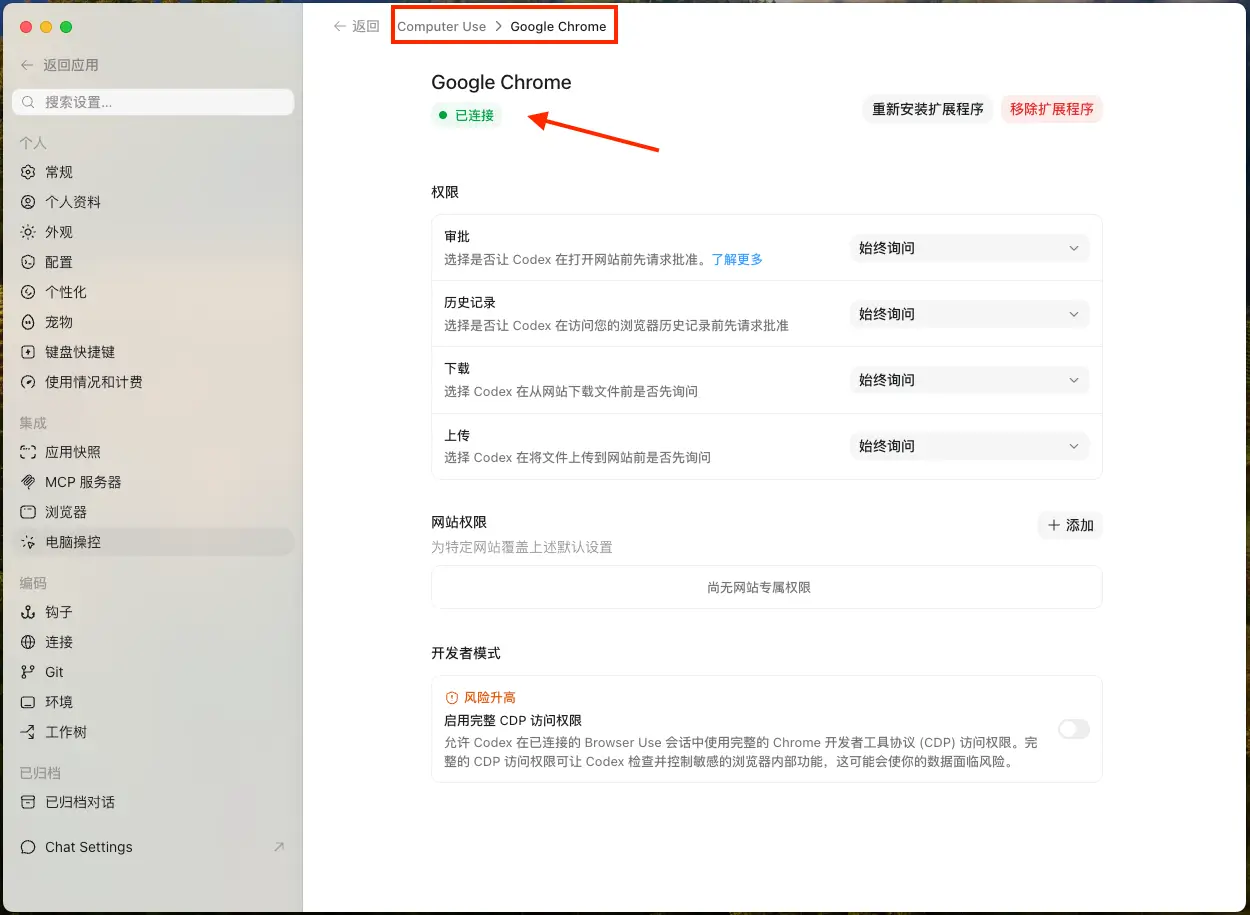
回 Codex 设置,Google Chrome 显示 「已连接」;这里可设权限(审批 / 历史 / 下载 / 上传),系统默认「始终询问」。Back in Codex settings, Google Chrome shows "Connected"; here you can set permissions (approval / history / download / upload)—the system default is "Always ask".
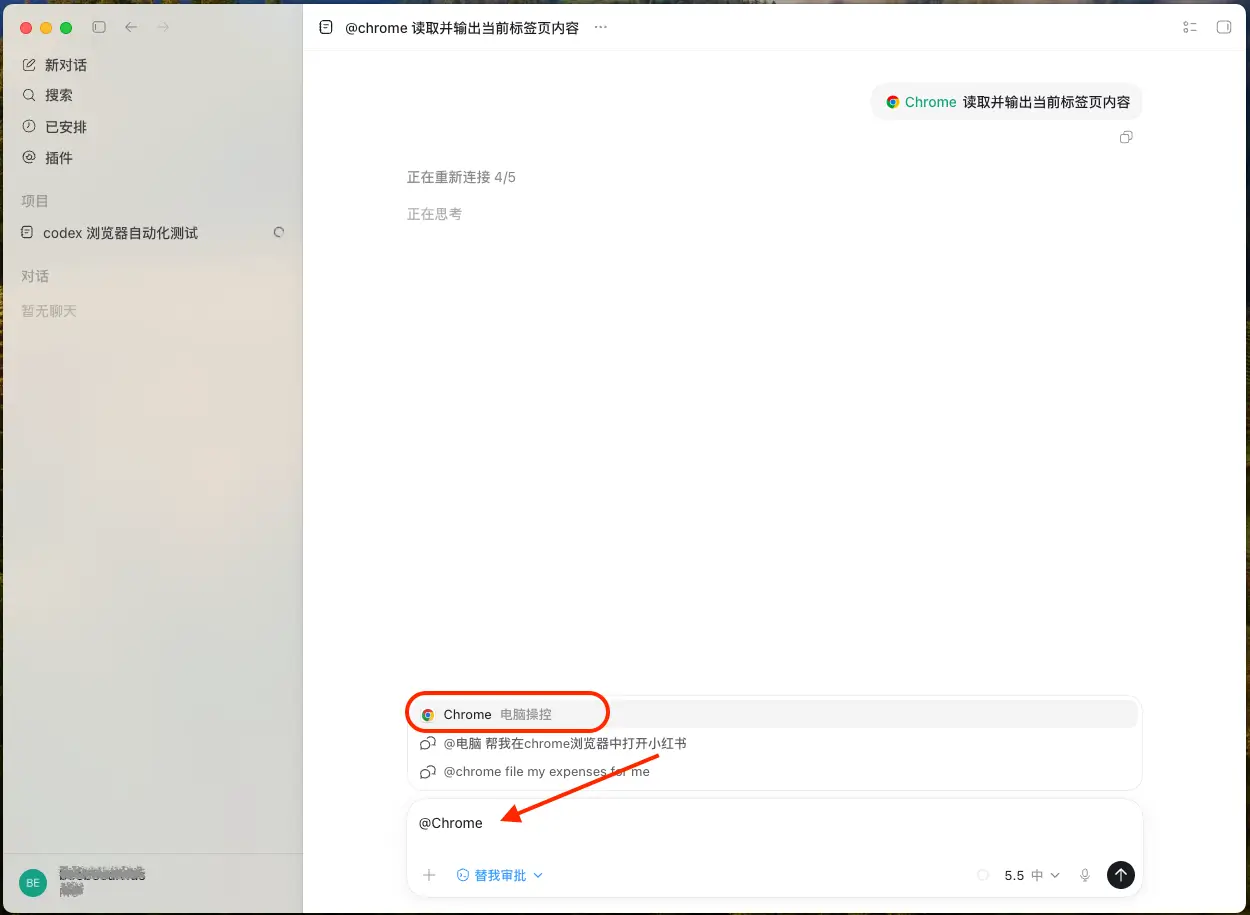
在对话里输入 @Chrome,发指令(如「读取并输出当前标签页内容」)。In the chat type @Chrome and send an instruction (e.g. "read and output the current tab's content").
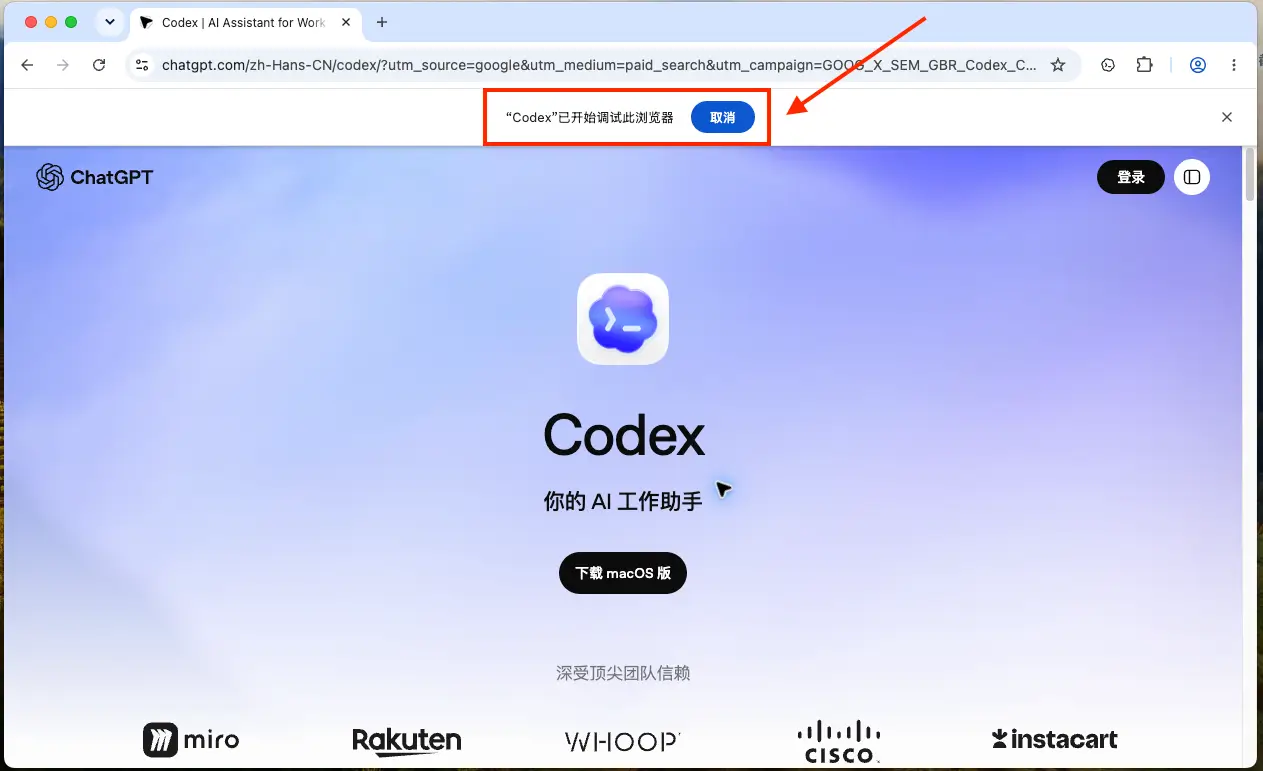
Chrome 顶部出现 「Codex 已开始调试此浏览器」 提示条,说明正在读。A bar "Codex started debugging this browser" appears at the top of Chrome—it's reading.
⑤ 设置里显示「已连接」+ 权限⑤ "Connected" + permissions in settings⑥ 对话里 @Chrome 发指令⑥ @Chrome in the chat⑦ 顶部「已开始调试」提示条⑦ "Started debugging" bar at top
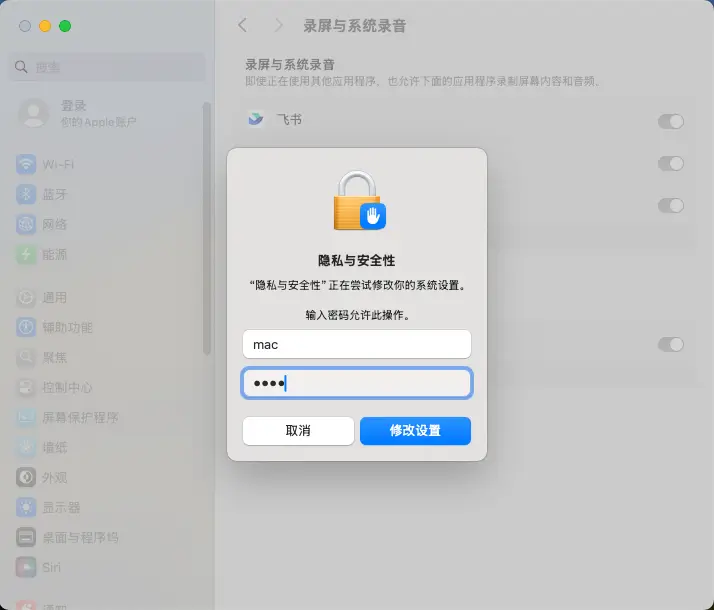
弹出密码框 → 输入系统密码 → 修改设置。A password box appears → enter your system password → Modify Settings.
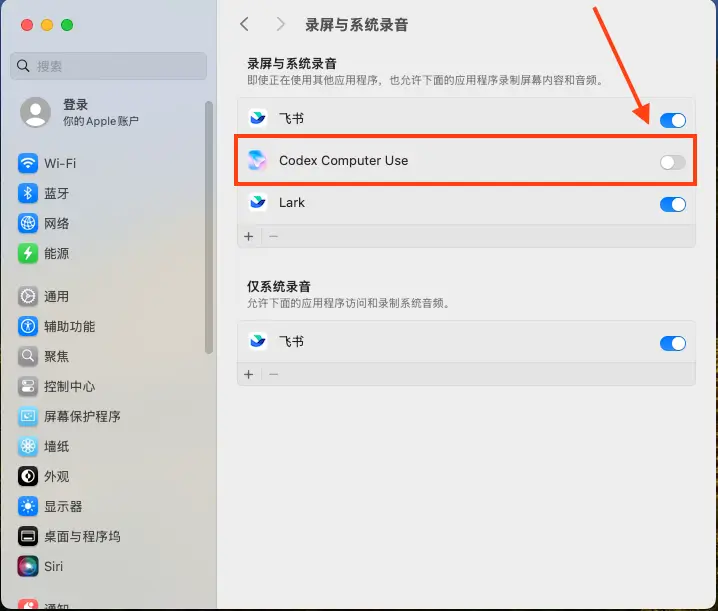
① 电脑操控里安装① Install under Computer control② 请求录屏权限② Screen-recording request③ 打开 Codex Computer Use 开关③ Turn on Codex Computer Use④ 输入系统密码④ Enter system password
Computer Use:使用Computer Use: Use
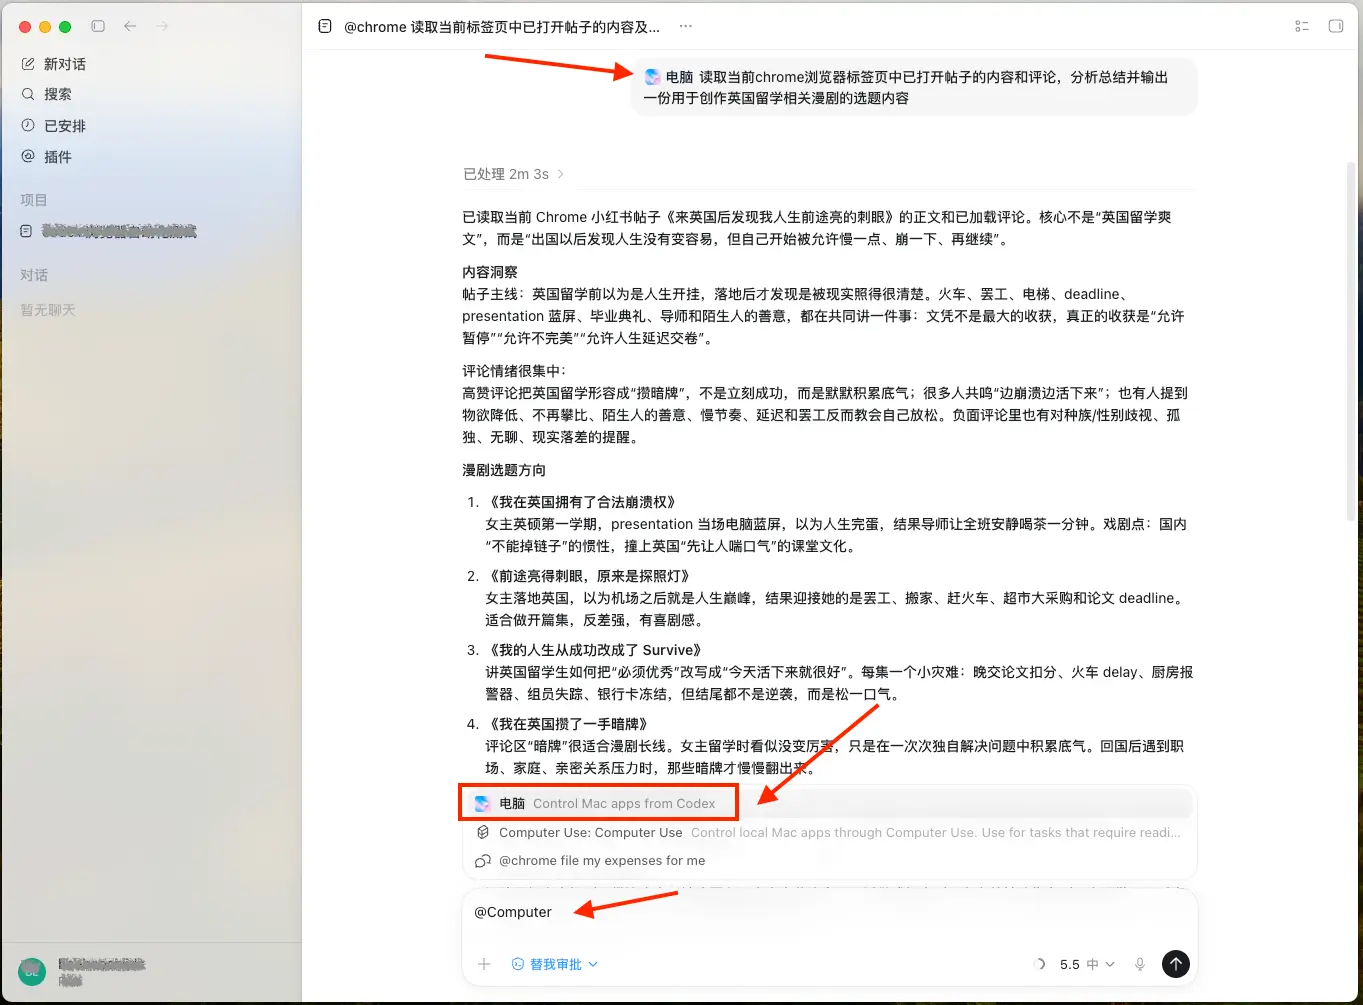
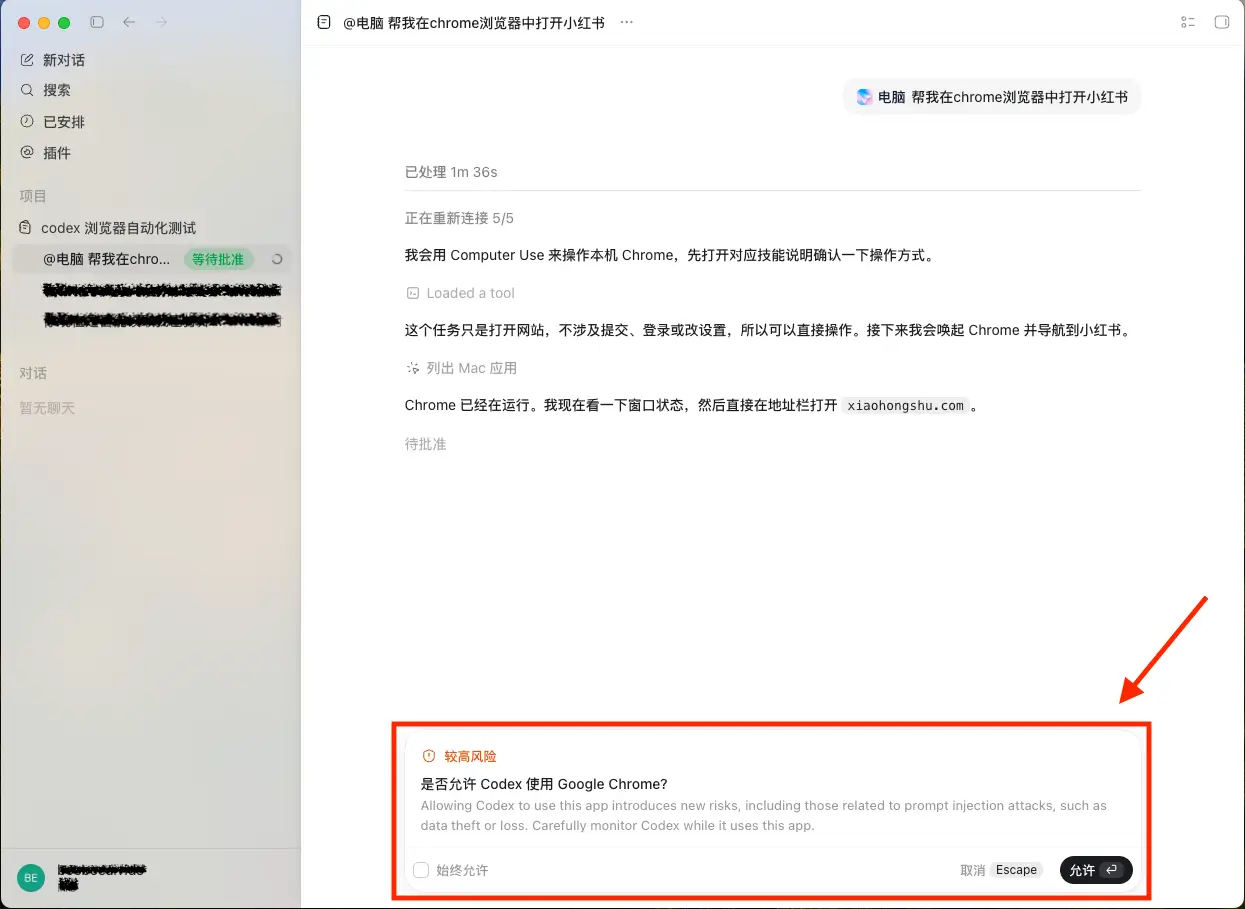
回到 Codex 对话,用 @Computer Use 发指令(让它读当前帖子的正文+评论并输出选题);每个动作会弹「较高风险 · 是否允许使用 Google Chrome」→ 点 允许。Back in the Codex chat, use @Computer Use (have it read the current post & comments and output topics); each action shows "higher risk · allow Google Chrome?" → click Allow.
@Computer Use 读当前帖子 → 输出一份漫剧选题@Computer Use reads the current post → outputs a set of episode topics过程中每个动作点「允许」Click "Allow" for each action along the way
步骤 1:让 Codex 读评论、提炼选题Step 1: Have Codex Read Comments and Distill Topics
用刚才连好的方式读评论——两种场景、两种发法。Read comments with the method you just connected—two scenarios, two ways to ask.
场景 A · 单个帖子(用 @Chrome)Scenario A · One post (@Chrome)
操作:手动打开一个帖子、把评论多滚动展开,让它是当前标签页 → 回到 Codex 发:Do: Open one post, scroll and expand its comments, keep it as the active tab → in Codex send:
📋 Prompt📋 Prompt
@Chrome 读完我当前打开的这个小红书帖子正文和评论,总结生成 1 个可以拍成 2-3 分钟留学生漫剧的选题。
选题给我:
1) 标题钩子(像小红书爆款标题)
2) 痛点原话(引用评论里的话)
3) 用户场景(在哪、什么时候、什么情绪)
4) 情绪类型(代入型 / 信息型 / 好奇型)
5) 适合哪类留学生(准备去 / 刚落地 / 好奇)
硬性要求:真实地名一律用代号,例如 格拉斯哥→G市、伦敦→L市。@Chrome Read the Xiaohongshu post and comments currently open in my active tab, then summarize 1 topic that can become a 2-3 minute student comic-drama episode.
For the topic give me:
1) A title hook (like a Xiaohongshu viral headline)
2) The original pain point (quote a comment)
3) The user situation (where, when, what emotion)
4) Emotion type (immersive / informational / curious)
5) Which students it suits (about to go / just landed / curious)
Hard rule: replace every real place name with a code, e.g. Glasgow -> City G, London -> City L.
场景 B · 多个帖子自动看(用 @Computer Use)Scenario B · Several posts automatically (@Computer Use)
操作:要一次看好几个帖子再统一总结时,用 Computer Use:Do: To read several posts and summarize together, use Computer Use:
📋 Prompt📋 Prompt
@Computer Use 请在当前小红书页面里,自动打开 3-5 个与留学生生活相关的帖子,逐个查看正文和评论,最后分析总结出 3-5 个可以拍成 2-3 分钟留学生漫剧的选题。
每个选题给:标题钩子、痛点原话、用户场景、情绪类型、适合人群;真实地名一律用代号。
读的时候慢一点、不要频繁刷新或连续点击,避免触发平台风控。@Computer Use On the current Xiaohongshu page, automatically open 3-5 posts related to student life, read each post and its comments, then analyze and summarize 3-5 topics for 2-3 minute student comic-drama episodes.
For each topic give: title hook, quoted pain point, user situation, emotion type, audience; use coded place names.
Go slowly; avoid frequent refreshing or continuous clicking to reduce anti-bot risk.
✅ 应该看到✅ You should see
返回一组选题,每条五个字段齐全,地名已变成代号。A set of topics comes back, each with all five fields, place names turned into codes.
步骤 2:把选题存成一个文件,给网站用Step 2: Save the Topics to a File for the Site
操作:接着上一步的对话,发下面这段,让 Codex 把选题存到你的网站项目文件夹里。Do: In the same chat, send the prompt below so Codex saves the topics into your site's project folder.
📋 Prompt📋 Prompt
把上面这些选题整理成一个 JSON 文件,命名 topics.json,
字段用英文 key:title(标题钩子)、quote(痛点原话)、scene(场景)、emotion(情绪类型)、audience(适合人群)。
存到我的网站项目文件夹里,存好后告诉我文件路径。Turn the topics above into a JSON file named topics.json,
using English keys: title (hook), quote (pain point), scene, emotion, audience.
Save it into my website project folder and tell me the file path when done.
✅ 应该看到✅ You should see
项目文件夹里多出一个 topics.json,Codex 告诉你它的位置。A topics.json appears in your project folder and Codex tells you where.
步骤 3:让 Codex 把选题接进你的生成器Step 3: Have Codex Wire the Topics Into Your Generator
操作:在你的网站项目文件夹里,对 Codex 发下面这段。Do: Inside your website project folder, send Codex the prompt below.
📋 Prompt📋 Prompt
请先阅读这个网站项目的现有页面结构和生成器功能,不要改变原来的页面风格和已有功能。
请读取同目录的 topics.json(里面是我从真实评论提炼的选题:title/quote/scene/emotion/audience),在页面顶部"创作参数"上方新增一个"本周选题库"模块:
1) 把每条选题渲染成卡片,显示标题钩子、痛点原话、情绪类型、适合人群;
2) 点击某张卡片时,尽量匹配到页面里已有的场景、冲突、风格和角色选项,并生成这一集脚本初稿;
3) 如果某个选题暂时无法匹配到已有选项,就在卡片上标"需新增场景",不要硬改坏原来的生成器;
4) 在生成结果区域新增"漫画绘图提示词"模块,包括:封面图提示词、每个分镜各一条绘图提示词;
5) 每条绘图提示词要包含:人物、场景、动作、表情、镜头、光线、情绪、漫画风格、角色一致性关键词;
6) 每条绘图提示词旁边提供"复制"按钮,方便我复制到 Codex 里用 ImageGen 生成漫画图;
7) 点击不同选题卡时,脚本初稿和绘图提示词都要随之更新;
8) 沿用页面现有配色、字体和卡片风格;手机和电脑都要正常。
改完用"信息清晰 / 框架合理 / 视觉统一 / 原有功能没坏"四条自检,并启动本地预览,把预览地址发给我。不要给我讲代码。Please first read this website project's current page structure and generator behavior, without changing the original page style or existing features.
Please read topics.json in the same folder (my topics distilled from real comments: title/quote/scene/emotion/audience) and add a "This Week's Topics" module above the "creation parameters" at the top of the page:
1) Render each topic as a card showing the hook, quoted pain point, emotion type, and audience;
2) When a card is clicked, try to match it to the existing scene, conflict, tone, and character options, then generate an episode draft;
3) If a topic cannot be matched to the existing options yet, mark the card "needs new scene" and do not break the original generator;
4) Add a "Comic Image Prompts" module in the result area, including one cover-image prompt and one drawing prompt for each storyboard shot;
5) Each image prompt should include: character, setting, action, expression, camera, lighting, mood, comic style, and character-consistency keywords;
6) Add a "copy" button beside each image prompt so I can copy it into Codex and use ImageGen to create comic images;
7) When a different topic card is clicked, both the episode draft and image prompts should update;
8) Reuse the page's existing colors, fonts, and card style; it must work on phone and desktop.
When done, self-check against "clear info / sound frame / consistent look / original features still work", start a local preview, and send me the preview URL. Don't explain code to me.
⚠️ 卡住了⚠️ If stuck
它改坏了原有功能 / 样式跑偏 → 截图发给它,说“原来的生成还要能用,风格要和其它卡片一致,请修一下”。It broke the old feature or the style is off → send a screenshot and say "keep the old generator working and match the other cards' style, please fix".
✅ 做对的样子✅ Done right when
选题库出现在页面顶部;点一张卡片能生成脚本初稿和漫画绘图提示词;提示词能复制;原有功能没坏;手机上也正常。The topic module appears at the top; clicking a card generates an episode draft and comic image prompts; prompts can be copied; the old feature still works; and it displays fine on mobile.
点一个选题 → 验收生成结果Click a Topic → Check the Result
上一步已经把选题卡接上了生成器:在“本周选题库”点任意一张卡片,页面会把这条选题带入预设结构,生成一版脚本初稿和漫画绘图提示词。现在重点不是再开发功能,而是检查结果是否完整。The previous step wired the topic cards into the generator: click any card in "This Week's Topics" and the page fits that topic into the preset structure, producing an episode draft and comic image prompts. Now the goal is not to add another feature, but to check the result.
标题 & 钩子Title & Hook
封面标题、前 3 秒台词。Cover title and first-3-seconds line.
封面和每个分镜都有复制按钮。Cover and storyboard prompts have copy buttons.
如果结果不自然,用这句让 Codex 微调,不要重新开发一遍:If the result feels unnatural, use this prompt to tune it without rebuilding the feature:
📋 Prompt📋 Prompt
我点选题卡后,脚本初稿和漫画绘图提示词已经生成了。
请帮我检查这次生成结果:标题是否抓人、分镜是否贴近真实留学生活、绘图提示词是否能直接用于 ImageGen。
如果有不自然的地方,请在不改页面风格和其它功能的前提下优化。After I clicked the topic card, the episode draft and comic image prompts were generated.
Please check this result: whether the title is compelling, the storyboard feels like real student life, and the image prompts can be used directly with ImageGen.
If anything feels unnatural, optimize it without changing the page style or other features.
✅ 到这里✅ At this point
从“一句真实评论”到“一集可拍的脚本”,全程你只点了几下、说了几句话,一行代码没写。From "one real comment" to "a shootable episode", you only clicked a few times and said a few sentences—not a line of code.
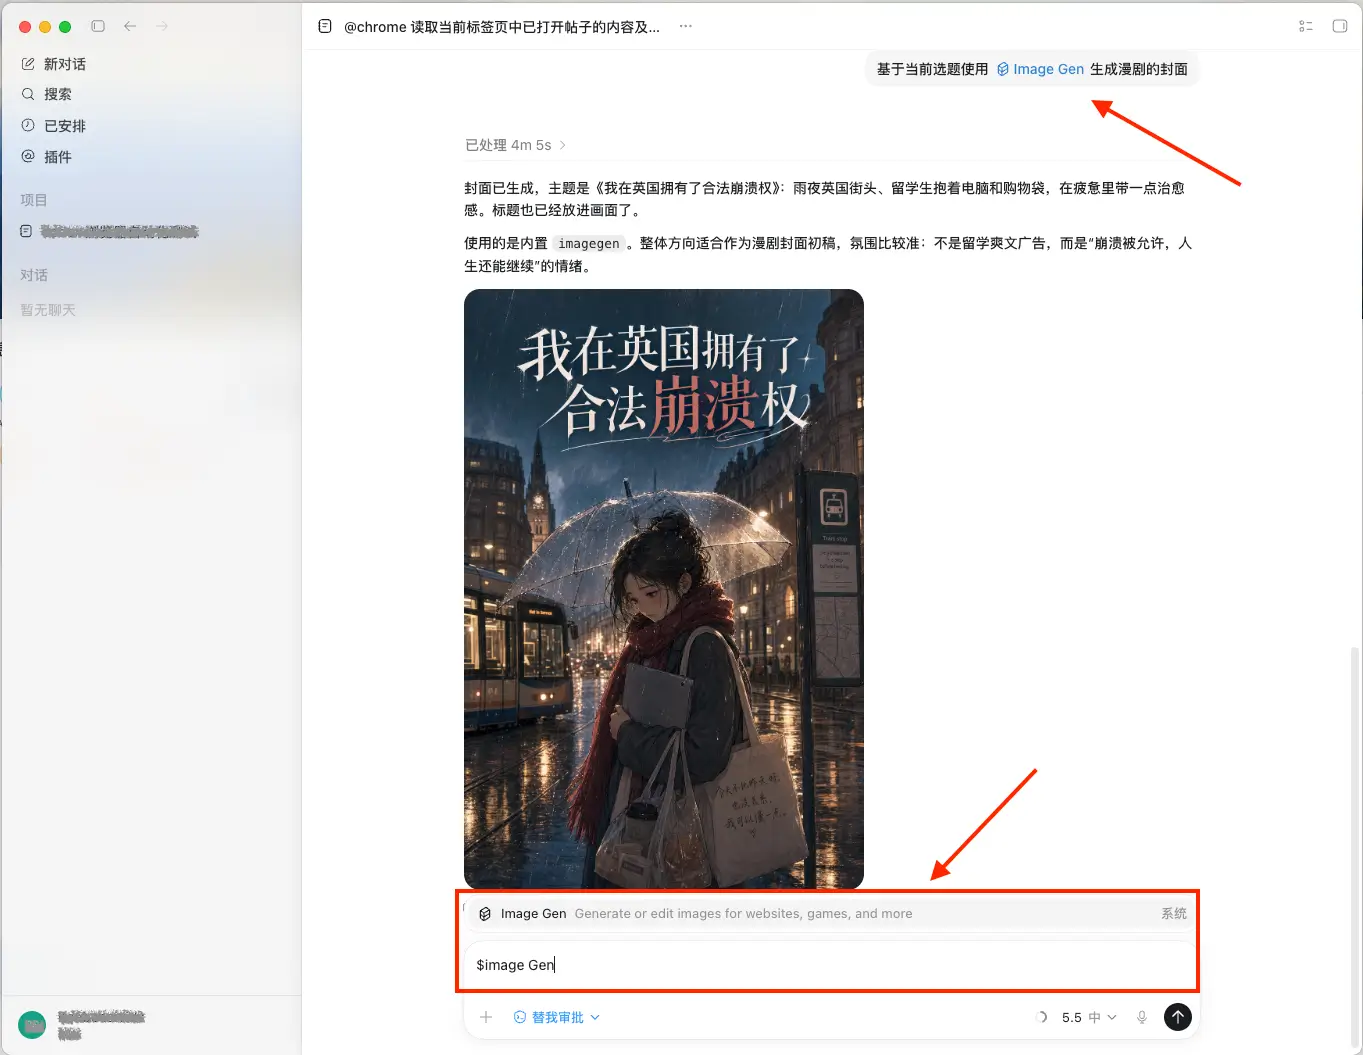
网站已经帮你把选题拆成了“封面图提示词”和“分镜绘图提示词”。下一步不用重新写提示词,只需要点复制,把网站里的提示词粘贴到 Codex,让它用 ImageGen 出图。今天先跑通“选题 → 提示词 → 漫画图”,视频和配音可以后续交给剪映、可灵、即梦等工具继续做。The site has already turned the topic into a cover-image prompt and storyboard image prompts. Next, do not rewrite the prompt; just copy the prompt from the site, paste it into Codex, and use ImageGen to create the image. Today we connect "topic -> prompt -> comic image"; video and voiceover can be continued later in tools like CapCut, Kling, or Jimeng.
📋 Prompt📋 Prompt
请使用 ImageGen,根据下面这段漫画绘图提示词生成图片:

【粘贴网站里复制的封面图提示词或某一条分镜绘图提示词】Please use ImageGen to create an image based on the comic image prompt below:

[Paste the cover-image prompt or one storyboard image prompt copied from the site]
① 把网站复制的绘图提示词交给 ImageGen① Give the copied image prompt to ImageGen② 得到一张可用于漫剧封面的漫画图② Get a comic image for the episode cover
步骤 4:上线(两种方式)Step 4: Deploy (Two Ways)
本地验收通过后再上线。优先让 Codex 部署;如果插件授权或部署卡住,就用 Netlify 手动拖拽兜底。Deploy only after local checks pass. Prefer Codex deployment; if plugin authorization or deployment gets stuck, use Netlify manual drag-and-drop as the fallback.
方式 A · Codex 部署Way A · Deploy with Codex
在 Codex Plugins 里找到 Netlify,按引导完成授权;回到对话,让 Codex 部署。Find Netlify in Codex Plugins, complete authorization, then ask Codex to deploy.
方式 B · 手动拖拽Way B · Drag and Drop
访问 netlify.com 注册/登录 → Add new project → Deploy manually → 拖入完整网站文件夹。Visit netlify.com and sign up/log in -> Add new project -> Deploy manually -> drag in the complete site folder.
📋 Prompt📋 Prompt
把这次改动部署上线(这个项目部署在 Netlify),
完成后把可以访问的网址发给我。Deploy this change (the project is hosted on Netlify),
and when done, send me the live URL I can open.
手动拖拽怎么做Manual Drag-and-Drop
拖的是整个网站项目文件夹,不是只拖 index.html。文件夹里要包含 index.html、topics.json、图片/头像等资源。上传完成后,Netlify 会生成一个 .netlify.app 网址。Drag the entire website project folder, not only index.html. The folder should include index.html, topics.json, images/avatars, and other assets. After upload, Netlify gives you a .netlify.app URL.
更新同一个网址Update the Same URL
以后更新网站时,进入同一个 Netlify 站点的 Deploys 页面重新拖拽上传;不要每次从 Add new project 新建,否则可能得到新的网址。For future updates, open the same Netlify site's Deploys page and drag in the new folder there; do not create a new project every time, or you may get a new URL.
✅ 应该看到✅ You should see
拿到一个线上网址,打开能看到更新后的“本周选题库”和漫画绘图提示词。You get a live URL; opening it shows the updated "This Week's Topics" and comic image prompts.
让它“半自动”跑起来Make It Run "Semi-Automatically"
你不用天天从零想选题——把上面这套变成一个固定的每周动作:You don't invent topics from zero daily—turn the above into a fixed weekly routine:
1
每周读一次评论Read Weekly
单帖用 @Chrome,多帖用 @Computer Use,刷新一批选题。Use @Chrome for one post, or @Computer Use for several posts, to refresh a batch of topics.
2
更新选题库Update Topics
让 Codex 更新 topics.json 并重新部署。Have Codex update topics.json and redeploy.
3
首屏显示“本周待拍”Show "To Shoot"
打开网站就看到本周最该拍的选题。Open the site to see this week's top topics.
📋 以后每次更新就发这句📋 Send this each time you update
把我这批新选题更新到 topics.json 里,然后重新部署上线,完成后把网址发我。Update topics.json with my new topics, then redeploy the site, and send me the URL when done.
兜底:Codex 读不稳时Fallback: When Codex Reading Is Unstable
@Chrome 或 @Computer Use 读评论卡住时,不要硬等。换一条路线:用 Chrome 扩展 Star Seeker 自动抓取当前打开帖子的评论,导出 CSV 或 Word 文件,再交给 Codex 分析。If @Chrome or @Computer Use gets stuck while reading comments, switch routes: use the Chrome extension Star Seeker to capture comments from the currently open post, export them as CSV or Word, then give the file to Codex for analysis.
卡在哪里Where It Gets Stuck
兜底做法Fallback
Codex 读评论超时Codex times out
安装 Star Seeker,自动抓取当前帖子的评论,导出 CSV 或 Word。Install Star Seeker, capture comments from the current post, and export CSV or Word.
评论太多、页面太长Too many comments
先把原始评论保存成文件,再让 Codex 从文件里提炼 3-5 个选题。Save the raw comments as a file first, then ask Codex to distill 3-5 topics from that file.
想批量分析更多帖子Need batch analysis
Star Seeker 可配自己的 API key 做自动分析;也可以只导出文件,后续交给 Codex。Star Seeker can use your own API key for automated analysis; or just export files and analyze later with Codex.
📋 评论文件交给 Codex 后这样说📋 After Giving Codex the Comment File
请读取这个评论文件,从中提炼 3-5 个可以拍成 2-3 分钟留学生漫剧的选题。
每个选题给:标题钩子、痛点原话、用户场景、情绪类型、适合人群。
真实地名一律用代号;不要编造评论里没有的信息。Please read this comment file and distill 3-5 topics for 2-3 minute student comic-drama episodes.
For each topic, give: title hook, quoted pain point, user situation, emotion type, and audience.
Use coded place names; do not invent information that is not in the comments.
如果使用 Star Seeker 的自动分析功能,可以自行注册 API key,选择 GPT 或其它模型;通常按量计费,小规模评论分析费用较低。API key 不要发给别人,也不要贴在公开网页里。If using Star Seeker's automated analysis, you can register your own API key and choose GPT or another model; usage is usually metered and small comment batches are low cost. Do not share your API key or put it on a public webpage.